Table of Contents

Welcome to WP-Nordic documentation

Setup Google Consent Mode v2 with Cookie Care

Powered by the leading agency WP-Nordic

This guide offers the necessary steps for setting up Google Consent Mode v2 alongside Cookie Care.

Table of Contents

Before we begin, these are the prerequisites

Choose the relevant section for you:

Google Analytics Setup with Cookie Care

This section applies if you’re only using Google Analytics, not Google Tag Manager.

Step 1: Find Your Google Analytics ID

  1. Log in to your Google Analytics account.
  2. Locate your tracking ID. Refer to this Google article for detailed instructions if you need help: https://support.google.com/analytics/answer/9539598?hl=en.
  3. Note down your ID for later use.

Step 2: Access Cookie Care Settings

  1. Log in to your website where Cookie Care is installed.
  2. Navigate to the “Integration” page within the Cookie Care menu.

Step 3: Enter Your Google Analytics ID

  1. On the “Integration” page, locate the “Google Analytics Tracking ID” field.
  2. Paste the ID you obtained in Step 1, ensuring there are no spaces.
  3. Click “Save Changes” and wait for the confirmation.

Step 4: Testing with Tag Assistant

  1. To verify the setup, use Google Tag Assistant. If you’re unfamiliar with Tag Assistant, it’s recommended to learn its functionality before proceeding.
  2. Open your website with Tag Assistant.
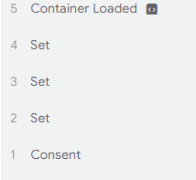
  3. You should see the first five events displayed as in the provided image. This is an initial indication of successful implementation.
  4. Interact with the cookie banner in the Tag Assistant debug window and update your consent.
  5. You should observe several additional events appear. The specific events depend on your updated consent settings.
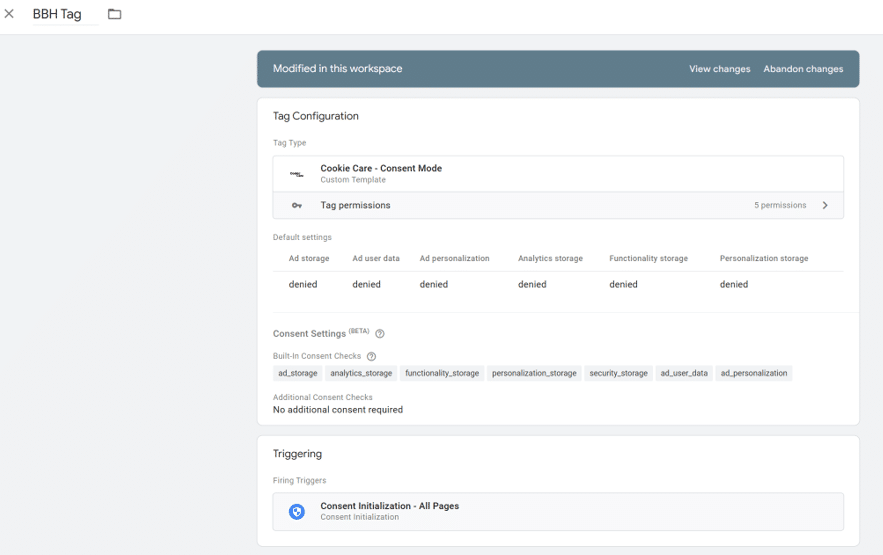
  6. Below the displayed events, you should see a new “Consent” event reflecting your updated consent level. The API call for this event should be “gtag(‘consent’, ‘update’, {…})”.

Step 5: Successful Setup

Congratulations! You’ve successfully set up Google Consent Mode v2 with Cookie Care.

Google Tag Manager Setup with Cookie Care

This section applies if you’re using Google Tag Manager, with or without Google Analytics. For connecting Google Analytics with Google Tag Manager, please refer to the official documentation.

Step 1: Find Your Google Tag Manager ID

  1. Log in to your Google Tag Manager account.
  2. Locate your container ID. Refer to this guide from Analytics Mania for help if needed: https://www.analyticsmania.com/post/google-tag-manager-id/.
  3. Note down your ID for later use.

Step 2: Obtain the Cookie Care Template (Optional)

  • While not mandatory, we recommend using our Consent Mode template for an easier setup in Google Tag Manager.
  • To access the template:
    • Search the Template Gallery
      • Go to Templates > Tag Templates > Search Gallery in your Google Tag Manager container.
      • Search for “Cookie Care.”
        • If you are unable to find the template, please reach our to our support team.
      • Select the “Cookie Care” template and click “Add to Workspace” followed by “Add” in the pop-up.
  • If using the downloaded file, go to New > … (three dots) > Import and select the file on your system.

Step 3: Using the Consent Mode Template (Optional)

  1. If using the template, go to Tags > New > Tag Configuration.
  2. Under Custom, select the “Cookie Care” template you added in Step 2.
  3. Click “Add Row” and then “Add” to set default consent values.
  4. Use 15000 for wait time for “Overlay or popup cookie box” and 500 for “banner.”
  5. Refer to tooltips for “URL passthrough” and “Ads data redaction” options.
  6. Under Advanced Settings, choose Consent settings and select “No additional consent required.”
  7. Now set the trigger, by pressing “Triggering”. It is IMPORTANT to set this to Consent initialization– All pages
  8. Click Save and name the tag appropriately.

Step 4: Setting up other tags

  • With the consent tag set up, proceed with configuring your remaining tags.
  • If using only Google Tags, use the All Pages or Initialization – All Pages trigger, as Google Tags handle consent internally.
  • If using non-Google Tags, consider using our custom events: cookie_cat_necessary, cookie_cat_functional, cookie_cat_marketing, and cookie_cat_analytics.

Step 4.5: Example of tags

This is an example of the three tags, you may use to connect Google Tag Manager to Google Analytics and the Cookie Care plugin.  

Step 5: Integrate with Cookie Care

  1. Log in to your website with Cookie Care and navigate to the Integration page in the Cookie Care menu.
  2. Locate the Google Tag Manager ID field and enter the ID obtained in step 1.
  3. Ensure there are no spaces and click “Save Changes.”

Step 6: Using the Consent Mode Template (Conditional)

The settings referenced in this step is the ones from inside the Integration page, in the Cookie Care plugin.

  • If using the template: Check the box just below the Google Tag Manager ID field.
    • Proceed to step 8.
  • If NOT using the template: Refer to step 4 of the “Google Analytics Setup” section.

Step 7: Testing

  1. To verify the setup, use Google Tag Assistant. If you’re unfamiliar with Tag Assistant, it’s recommended to learn its functionality before proceeding.
  2. Open your website with Tag Assistant.
  3. Look for the first five events displayed as in the provided image (initial indication).
    • If it says that your “GTM-XXXXX has not been published, click the button Debug “live” version. You may not see all the events, but you should at least see the ones below, and the rest of the events should work properly. 
  4. Interact with the cookie banner in the Tag Assistant debug window and update your consent.
  5. You should observe several additional events, depending on your updated consent settings.
  6. Below the displayed events, a new “Consent” event should appear, reflecting the updated consent level. The API call for this event should be “gtag(‘consent’, ‘update’, {…})”.

Step 8: Submit

After testing, make sure to press the Submit button, that is found beside the Preview button. By submitting you make sure that changes you made to Google Tag Manager is reflected on your site.

  • If you used the Debug “live” version when testing, make sure to test again, and make sure the first events are equal to the ones below.

Discover more plugins from WP-Nordic

Behind WP Nordic lies a team passionate about WordPress and its vast possibilities.

Quality First Approach

Our plugins, though selective, stand out. Every product is meticulously crafted, ensuring only top-notch offerings for your website

Optimized for Speed

We recognize the array of plugins on your website. Our focus? Creating plugins that are both lightweight and quick, boosting your site's performance.

Always Available Support

Need assistance? Our support team is always ready to help on working days, making us a reliable partner for all your needs